
Infrastructure changes come with two kinds of risk: technical and financial. You've probably got the technical side covered with blast radius analysis, security scanning, and policy checks. But what about the cost impact?
That's where our new Infracost integration comes in. It doesn't just tell you how much a change will cost - it turns cost analysis into quantitative signals that sit alongside your other risk assessments, giving you one complete picture before you hit deploy.
The Problem with Cost Analysis Today
Most teams handle cost analysis separately from their other change review processes. You might run Infracost in your pipeline to see cost estimates, but that data lives in isolation. When you're reviewing a pull request, you're mentally juggling:
- "This change affects 47 resources" (blast radius)
- "We've got 2 policy violations" (governance)
- "Monthly cost increases by $850" (financial impact)
- "This resource type has caused issues before" (risk signals)
Each piece of information comes from a different place, and you're left trying to weight them against each other in your head. Is an $850 increase a big deal? Depends on whether it's a 5% bump or a 200% spike. And how does that stack up against the blast radius?
How It Actually Works
The integration converts cost changes into severity signals that combine with everything else Overmind's already tracking.
Here's the flow when you open a PR:
- Your GitHub Action runs the terraform plan like normal
- While Overmind's analyzing blast radius and risks, the Infracost action calculates cost changes in parallel
- Cost changes get converted into severity scores (-4 to +3) based on percentage increase
- Everything combines into one unified view
Here's the key bit: the scoring is completely configurable for your company. One organization might consider 15% a minor bump. Another might freak out at anything over 2%. It depends entirely on your scale and budget constraints.
With the default settings, a 15% increase gets a -1 (minor concern) and a 150% spike gets -4 (critical). But you can tune those thresholds to whatever makes sense for your setup. We'll get into that below.
Cost reductions generate positive signals too, so you can actually track when optimization work pays off.
The Severity Scale
Here's how cost changes get scored, out of the box with no additional configuration:
Changes under 5% don't generate signals - this keeps you focused on meaningful shifts instead of noise.
Setting It Up
Takes about 5 minutes. You're just adding one job to your GitHub Actions workflow.
What You'll Need
- An Overmind account (free to sign up)
- An Infracost API key (also free at infracost.io)
- A GitHub repository with Terraform code
- About 5 minutes
Basic Installation
Add this to your .github/workflows/terraform.yml:
name: Terraform with Cost Analysis
on:
  pull_request:
    types: [opened, synchronize, reopened]

jobs:
  # Your existing Overmind analysis
  terraform:
    runs-on: ubuntu-latest
    steps:
      - uses: actions/checkout@v4
      - uses: overmindtech/actions/install-cli@main
      - uses: overmindtech/actions/submit-plan@main
        with:
          ovm-api-key: ${{ secrets.OVM_API_KEY }}
          plan-json: ./tfplan.json

  # New cost analysis job
  cost-analysis:
    runs-on: ubuntu-latest
    steps:
      - uses: actions/checkout@v4

      - name: Setup Terraform
        uses: hashicorp/setup-terraform@v3

      - name: Generate Terraform Plan
        run: |
          terraform init
          terraform plan -out=tfplan
          terraform show -json tfplan > tfplan.json

      - uses: overmindtech/cost-signals-action@v1
        with:
          overmind-api-key: ${{ secrets.OVM_API_KEY }}
          infracost-api-key: ${{ secrets.INFRACOST_API_KEY }}
          terraform-plan-json: ./tfplan.json
Don't forget to add both API keys to your GitHub repository secrets.
The two jobs run in parallel, so cost analysis doesn't slow down your existing workflow.
Configuring Your Thresholds
The default settings work for most teams, but you might want to tune them based on your organization's needs.
Understanding the Default Thresholds
Out of the box, the integration uses:
- 20% change threshold - Needs to increase or decrease by at least 20% to generate a signal
- $500 absolute threshold - OR needs to change by at least $500/month
- Both increase and decrease tracking - Positive signals for cost reductions, negative for increases
These defaults strike a balance between catching significant changes and avoiding alert fatigue.
When to Adjust Thresholds
Lower the percentage threshold if you're working with:
- Tighter budget constraints
- Early-stage infrastructure where small changes matter
- Production environments where you want strict cost control
- uses: overmindtech/cost-signals-action@v1
  with:
    overmind-api-key: ${{ secrets.OVM_API_KEY }}
    infracost-api-key: ${{ secrets.INFRACOST_API_KEY }}
    threshold-percentage: 10  # More sensitive
Raise the percentage threshold if you have:
- Large-scale infrastructure where 20% changes are routine
- Development environments where cost fluctuations are expected
- Lots of dynamic scaling that creates noise
- uses: overmindtech/cost-signals-action@v1
  with:
    overmind-api-key: ${{ secrets.OVM_API_KEY }}
    infracost-api-key: ${{ secrets.INFRACOST_API_KEY }}
    threshold-percentage: 50  # Less sensitive
Adjust the absolute threshold based on your monthly cloud spend:
- Small infrastructure (< $10k/month): Lower to $100-200
- Medium infrastructure ($10k-100k/month): Keep at $500
- Large infrastructure (> $100k/month): Raise to $1000+
Different Rules for Different Environments
You'll want stricter thresholds in production than in dev:
# Production - strict
- uses: overmindtech/cost-signals-action@v1
  if: github.base_ref == 'main'
  with:
    overmind-api-key: ${{ secrets.OVM_API_KEY }}
    infracost-api-key: ${{ secrets.INFRACOST_API_KEY }}
    threshold-percentage: 10
    threshold-absolute: 200
    fail-on-threshold: true  # Actually block the PR

# Dev - relaxed
- uses: overmindtech/cost-signals-action@v1
  if: github.base_ref == 'develop'
  with:
    overmind-api-key: ${{ secrets.OVM_API_KEY }}
    infracost-api-key: ${{ secrets.INFRACOST_API_KEY }}
    threshold-percentage: 30
    threshold-absolute: 1000
    fail-on-threshold: false  # Just warn
Additional options
Only track increases (skip the decreases):
submit-on-decreases: false
Good if you only care about preventing overruns, not celebrating wins.
Switch the currency:
currency: EUR # or GBP, USD, whatever
Block PRs that breach limits:
fail-on-threshold: true
Be careful with this - it's enforcement, not just information. Fine for prod, probably too strict for dev.
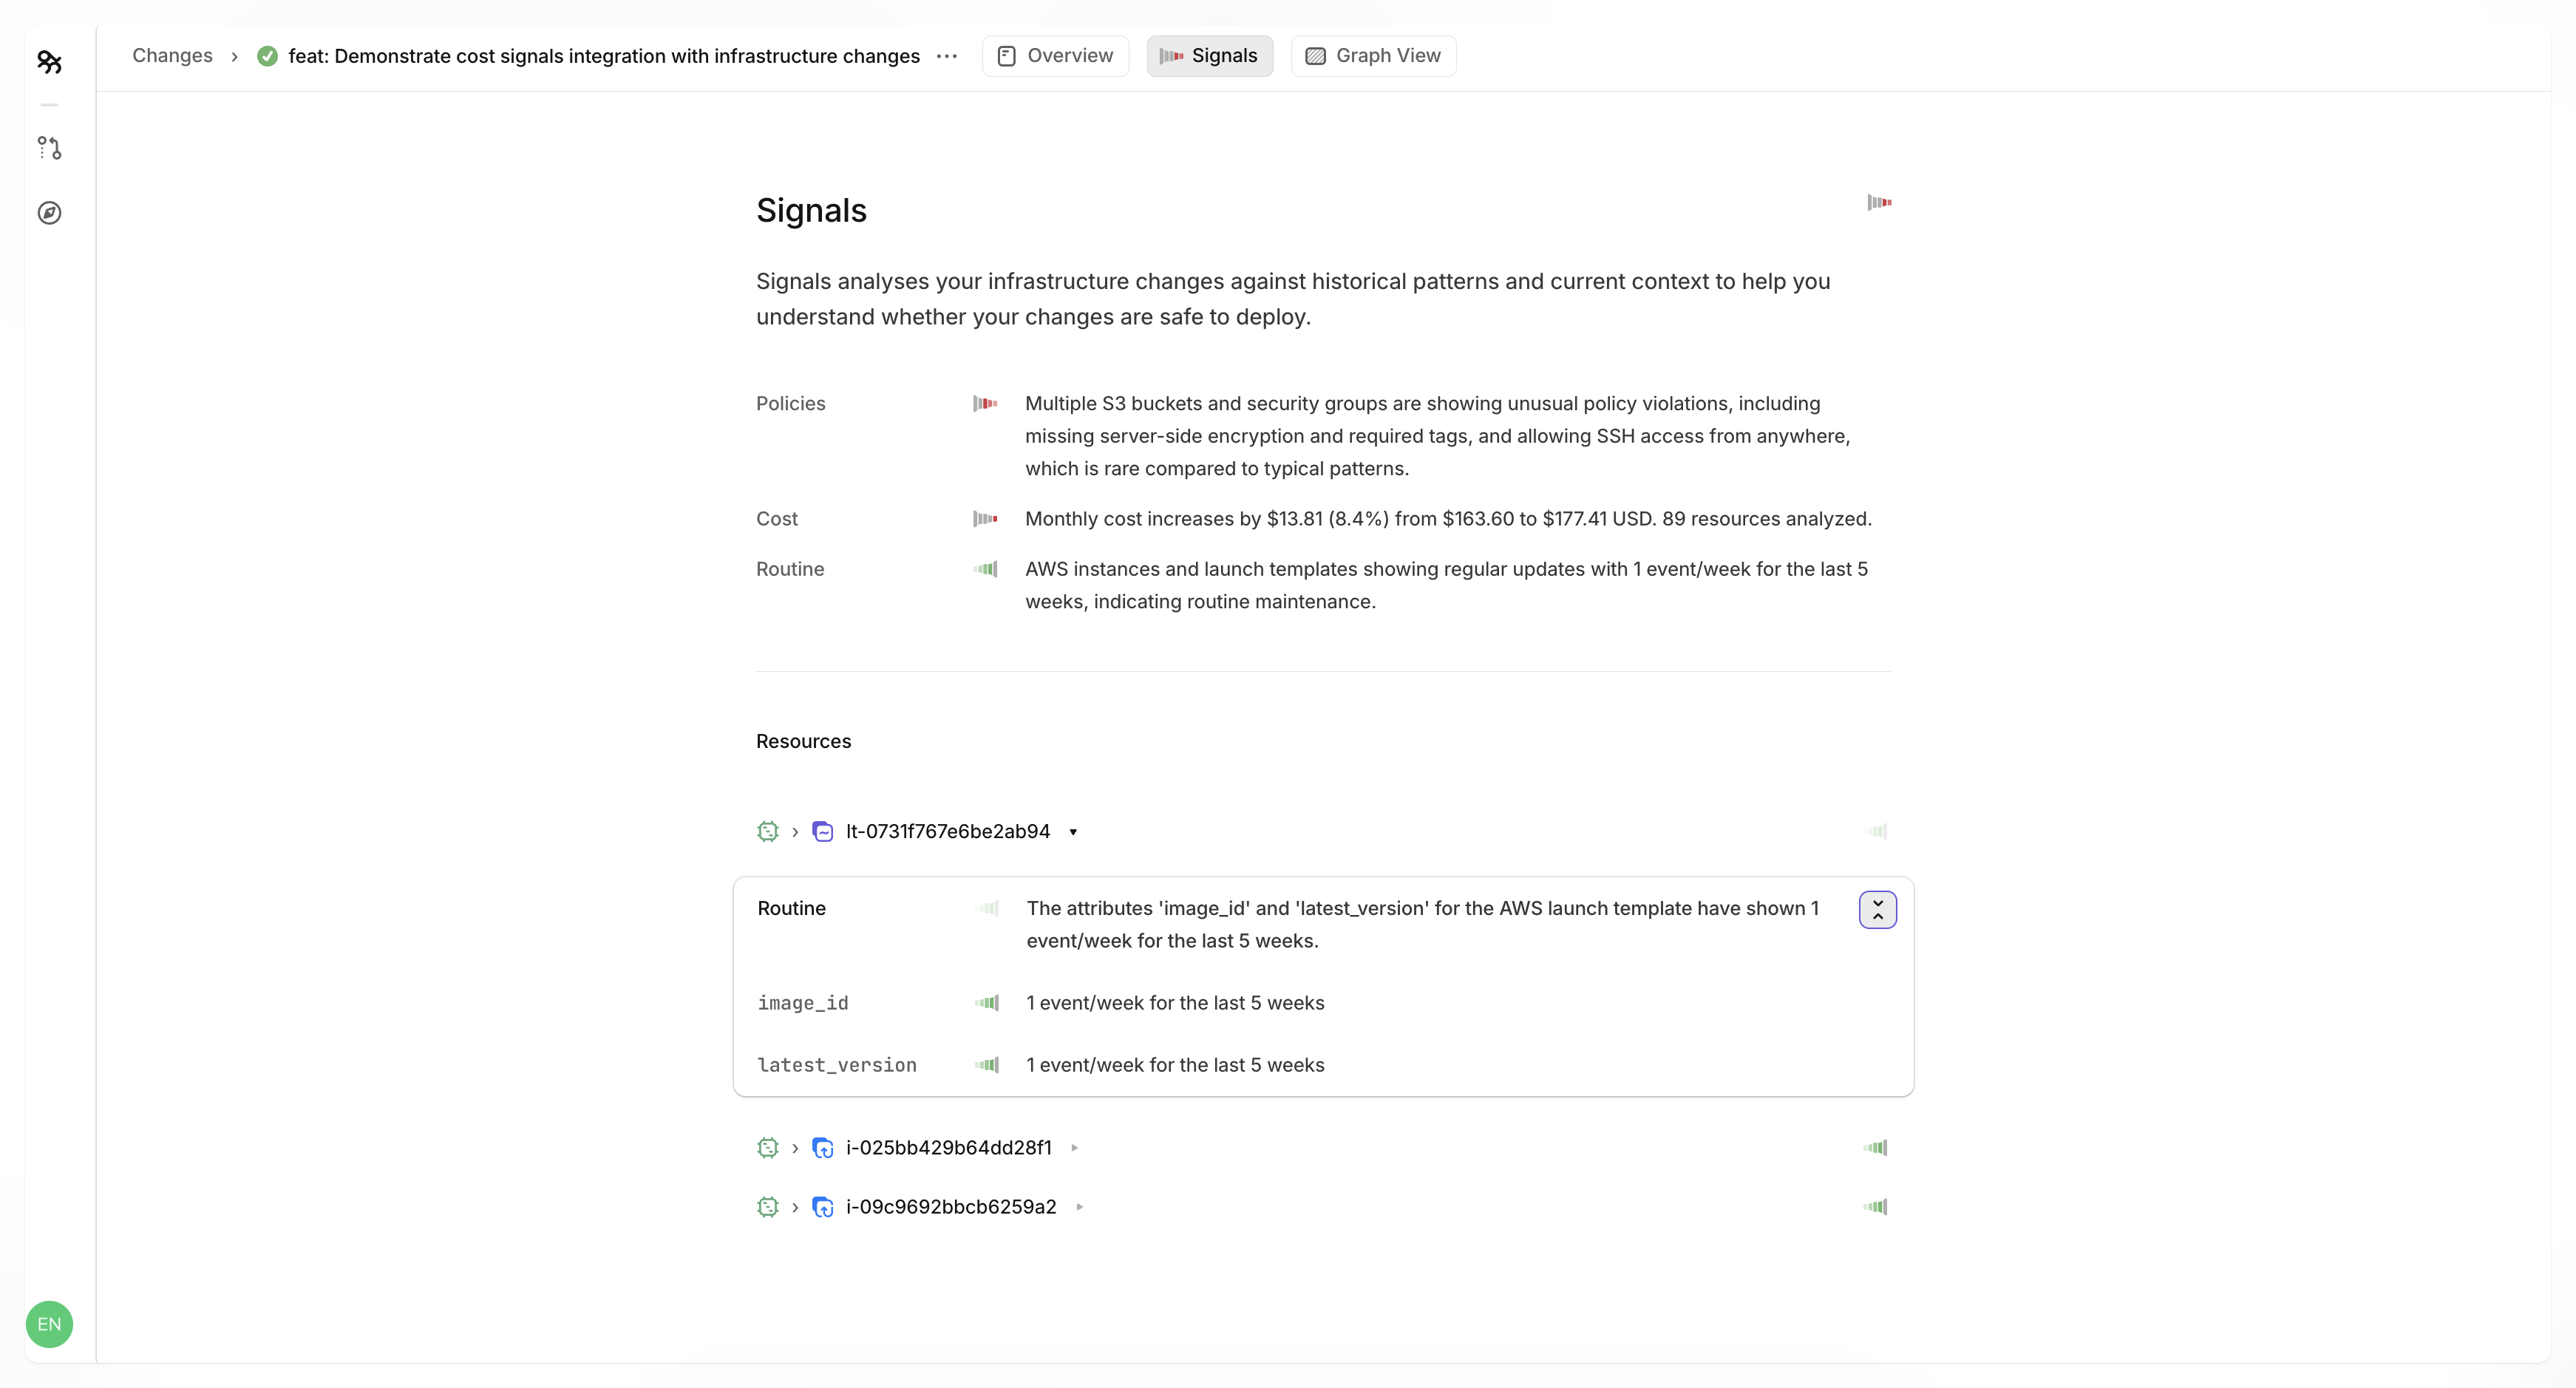
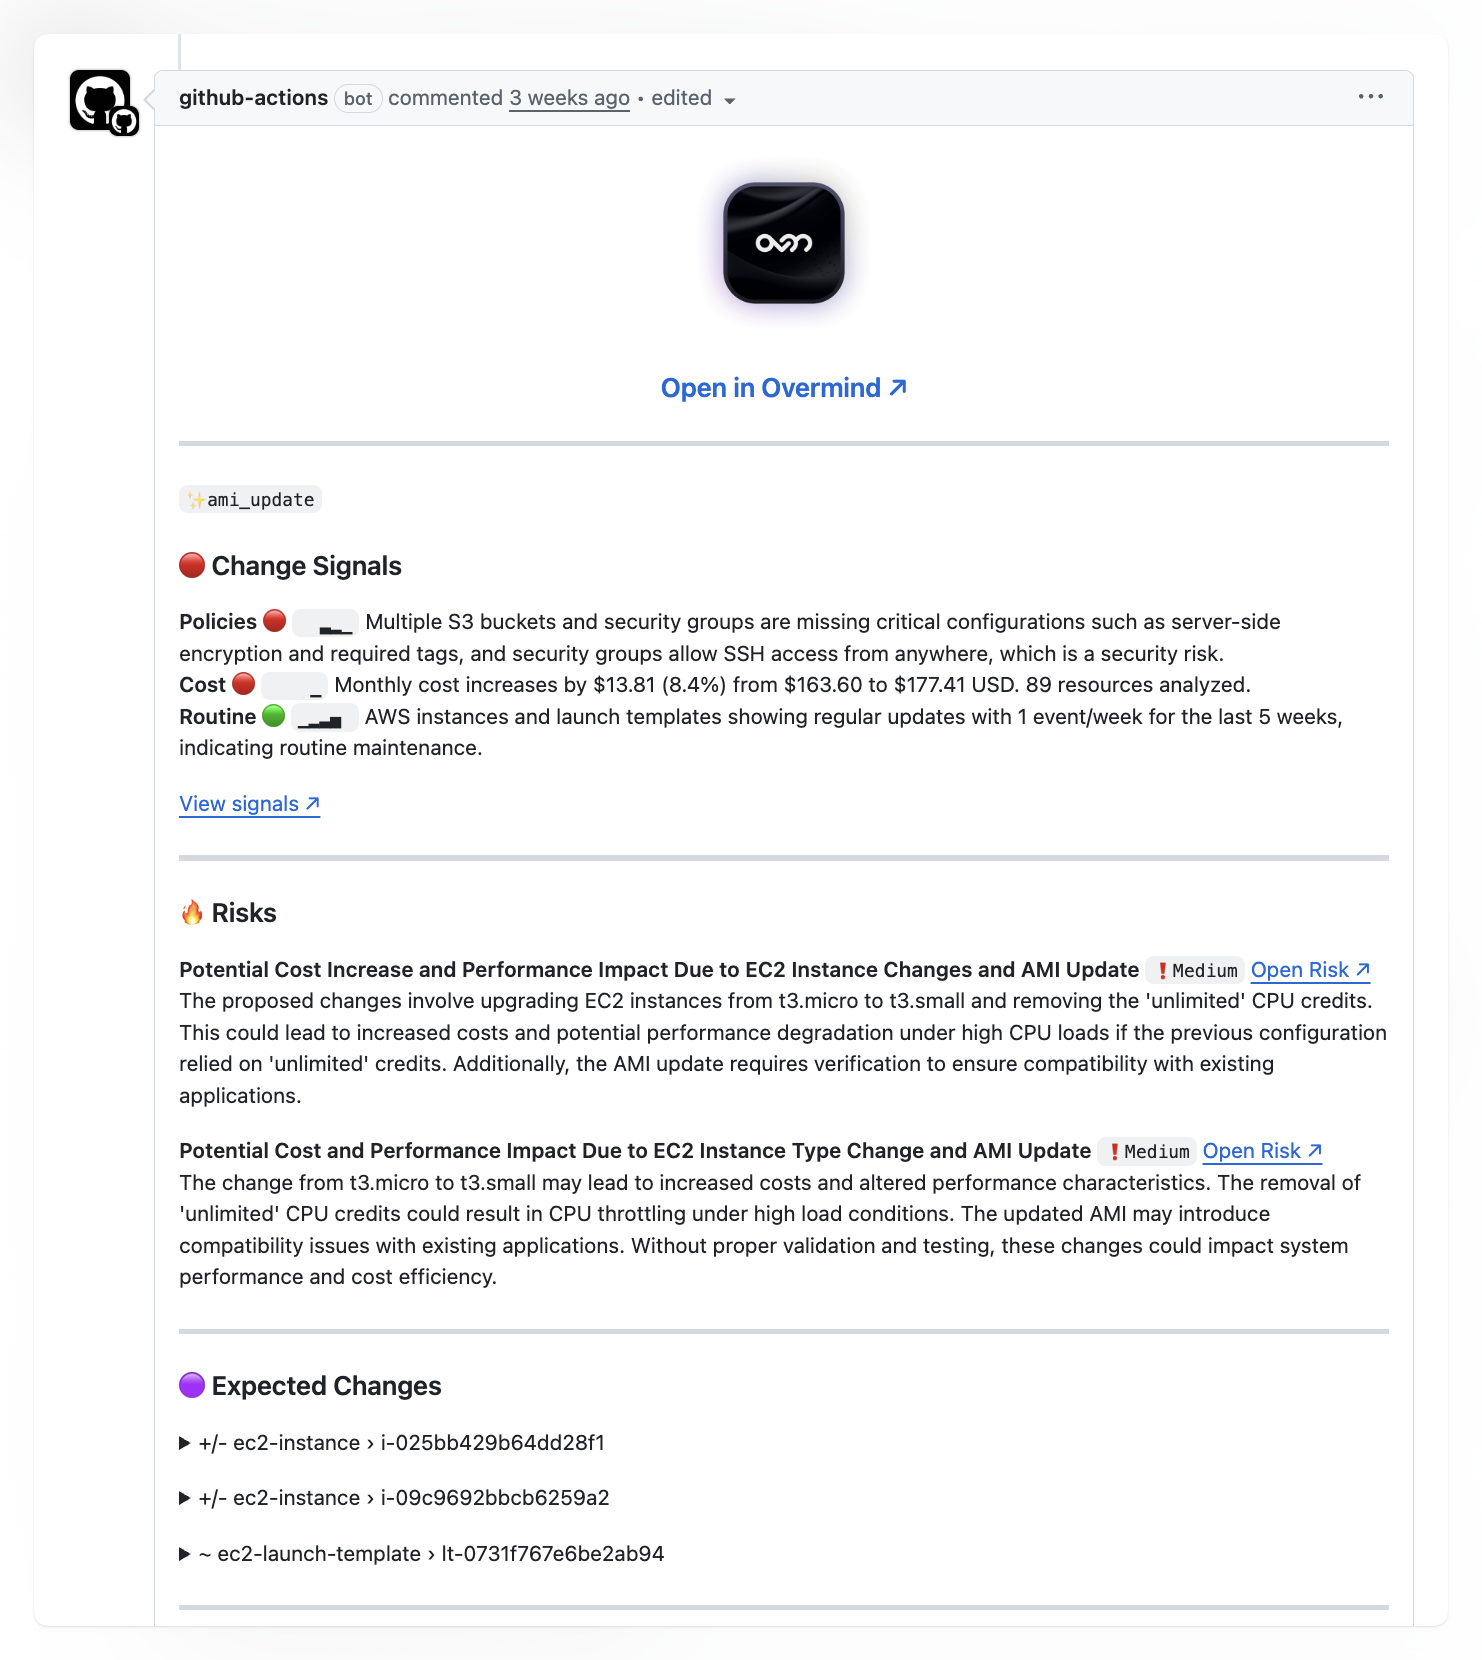
What It Looks Like
Once it's running, cost context shows up right in your PRs next to your other Overmind data.
Here's a typical comment:
Get Started
Ready to add cost signals to your infrastructure changes?
- Grab the GitHub Action: github.com/overmindtech/cost-signals-action
- Sign up for Infracost: infracost.io
- Full documentation: docs.overmind.tech
The integration takes about 5 minutes to set up, and you'll immediately start seeing cost context alongside your other change analysis.
Stop guessing at the financial impact of your infrastructure changes. See the complete picture before you deploy.